
A Beginner’s Guide to Screen Printing
There are many; and this isn’t really one if them!
Some just say to take your screen, your item to print, along with your design template, and just pull the paint over them all. Done. Simple.
Others, more wisely, warn that the hardest part might actually be getting your design right, working out how to place your design on the printing area, using colour(s), overlays etc. I have seen mention that it’s a bit messy and that cleaning up needs to be done as soon as possible afterwards. Nowhere did i read that i should not do my screen printing in the garden on a baking hot day. Despite the fact that it appeared to be a really good idea, and that the really hot day had, in fact, kick started my attempts at screen printing.

I had booked a screen printing course for last April (2020), so of course, it got cancelled. So i decided to take the ‘teach yourself’ approach, with reference to a few ‘Beginners’ Guides‘.
Pulling the paint through the screen is probably the easiest part. I still have much to learn about getting the design right, placement on the item to be printed and management of colours. I learnt the hard way about cleaning up the mess. Basically, whilst a hot day might be good for drying the painted item (which actually takes quite a while), it also had the effect of baking the paint (curing, is i think, the right term) onto the screen, which was then rather difficult to clean off.

Luckily i chose to purchase my equipment and paint from a relatively local supplier, deliberately. https://screenprintworld.co.uk/ An email, asking whether it was right that my screen had ‘baked on’ paint, was quickly answered, along with, of course, a recommendation to buy some of their ‘super-cleaning’ gel, which would probably remove the baked paint. With postage the same cost as the cleaning gel itself, i asked if i could collect, as without a very lengthy traffic jam, my petrol would have cost less than the postage. But at least i know where they are now, and will probably collect supplies in future. Very good service.
And the super cleaning gel (that’s not the real name of the product) did the job, without too much trouble. Magic! My screen is now spotless after several uses.

Next time i decided that i ought to ‘trial’ the process indoors, using my old oil cloth table covering as a base. It’s still messy, and i found myself wanting to take the cleaning work outside rather than get the excess paint down my kitchen sink.
So after all that, what have i been screen printing?
Two things so far: several rustic lavender bags, filled with dried lavender recently purchased directly from Norfolk Lavender, whilst on holiday, and some cards. So one fabric project, and one paper project.
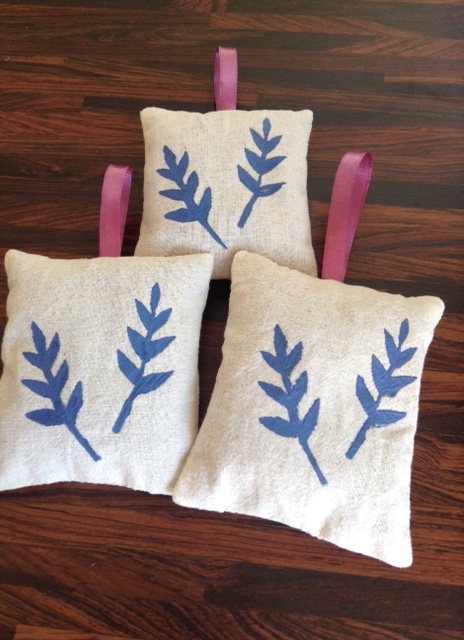
So far, all of my templates have been based on free downloads from the supplier’s site. I re-sized, printed out and traced each part of the design. For the fabric work, i cut my template from acetate. The acetate is proving to be quite robust. I have used it 11 times, with the same colour each time. It washes but has retained a background hue of the lavender colour. That’s probably not a problem, as lavender should be that colour!
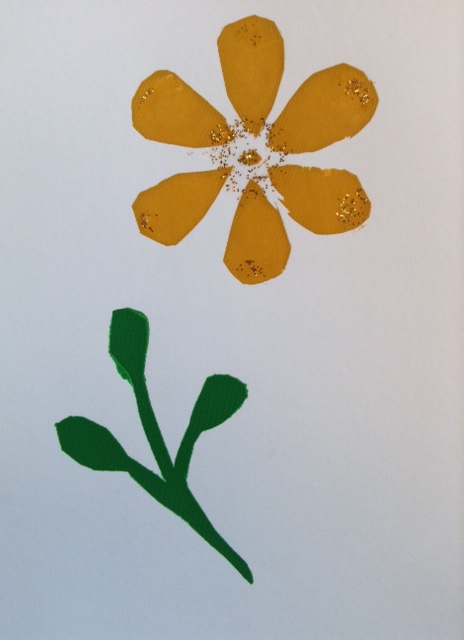
I’m still not fully clear about the role of freezer paper in screen printing, but it was part of my starter set, so i presume it is quite fundamental. For the cards, i decided to cut the templates from a piece of freezer paper the size of the item to be printed. At least that it what i will do next time! So the paper covers all of the area, except for the part that you want to be painted. I used 4 on my first card. Red and yellow were pulled through together, creating an ombre effect with some orange in between. Quite clever i thought, for a first attempt! Once that was dry, i used green, and when that was dry, i used a mustard shade. To be sure, i left the work for about 24 hours each time to dry, meaning that it took me over 2 days to make a couple of cards. This is the second card, without the ombre effect butterfly. Gold glitter added by hand.
‘Teach yourself’, ‘trial and error’, call it what you will. I picked up the general ideas and principles from my book, and then just tried it out. Whilst the freezer paper designs have each been used twice, i have thrown them away, as they are not robust and will not clean.
So what’s next?
I have more lavender. I have more undyed cotton. I still have the template. I might even have some friends who have never had a lavender bag from me! Or need another one….. So probably some more lavender bags.
I was in HobbyCraft the other day. It’s not the cheapest shop, but it does have plenty of parking, a wide range of stock, and a tea shop! And it had plain cotton bags for £1 each. I bought three. I doubt that i can make them for £1 each. At the moment i am thinking that i will make them all with the same, one coloured design, but i may end up getting more adventurous with the colours. This will present the minor challenge of making sure that the paint does not go through to the back of the bag. I have been stocking up on card board for that very purpose.
Christmas cards. Multiple copies of the same design. If i am doing a fair number, it’s probably worth the wait for them to dry, and doing multi-coloured.
And i am taking part in a programme for textile artists at the moment; no previous experience necessary! I want to include screen printing my my work. Right now i am having some trouble getting started, as i don’t know what i am going to do with the end result, and therefore, what scale to make it. But that’s another story, probably for another blog post or two.
2 comments on “A Beginner’s Guide to Screen Printing”
Leave a reply to Janet Cancel reply
One Week, One Pattern

Me Made May 2016

Me Made May 2015

Simplicity Competition

Sew Over it Patterns


This looks really fun – thank you for all the useful tips!
Little lengthy but worth reading. This post is really helpful for those you are started doing screen printing. Thanks For Sharing.