
The London fabric
I’ve been looking for some fabric suitable to re-cover my ironing board for some time, so was delighted to find ‘the London fabric’ whilst at the NEC in March. It turned out to be a roll end, so I got it a bit reduced. Its amazing what you can make from just over a metre of fabric.


The ironing board cover was made by effectively copying the original cover. The bag is the ‘small book bag’ from the Maker’s Atelier Essential Collection, and the peg bag is copied from a copy of the original i.e. third generation! An oven glove, which will also be a copy, will be made when the heat resistant wadding arrives. At which point there will only be bits of fabric left!
There are quite a few blogs out there about covering an ironing board, but here are my highlights, if that’s the right word!
- Took a photo of the back of my ironing board so I can see how it looked at the back.
- Removed the old cover
- Put the ironing board on top of the fabric and drew round it. Getting on the straight grain is not easy, and indeed, since its not going to hang, it may not be essential. The board doesn’t have straight sides, and there is no arrow to line up the grain…
- Put the old cover inside the drawn out shape, and carefully measured how much bigger it was all the way round. For information, most of it was 7cm, except at the iron rest end, where it was only 2 cm. Measured that onto the fabric and drew the cutting line.
- Marked gaps for tying the elastic (rounded end…) and half way down, where there is a (posh) rubber band on the underside of the cover.
- Cut.
- Pinned and then tacked strong tape in place all round the edges, leaving gaps as identified above. I suppose you could use bias binding, but it wouldn’t be as strong.
- Machine stitched the tape in place.
- Threaded thin elastic all the way round, starting and ending at the rounded end.
- Before tying off the elastic, fitted the cover to the board and evened out the gathers. Made it all nice and tight and then tied and cut the elastic.
- Pressed the new cover!

Then I washed the original cover to see whether it came up looking good or not. It’s better but not perfect. I should have done this ages ago. Its quite simple. Much as I hope this lasts, if I see a fabric calling out to be an ironing board cover, I will create a stash.
So now to the bag; my second make from The Essential Collection. This is the small bag. The large one is huge! I have lined it with a purple / black lining. All seams are stitched on the overlocker for strength. I followed the instructions and measurements as per the book. Only two comments: I think that the handles may be a bit short at 30cm each. With some unpicking I could replace them if necessary. I made them with fabric, rather than grosgrain. Secondly, I didn’t see any mention of needing grosgrain ribbon until I got to that point in the instructions. Luckily I had some in stock, as it is used to finish the inside of the bag and anchor the handles.
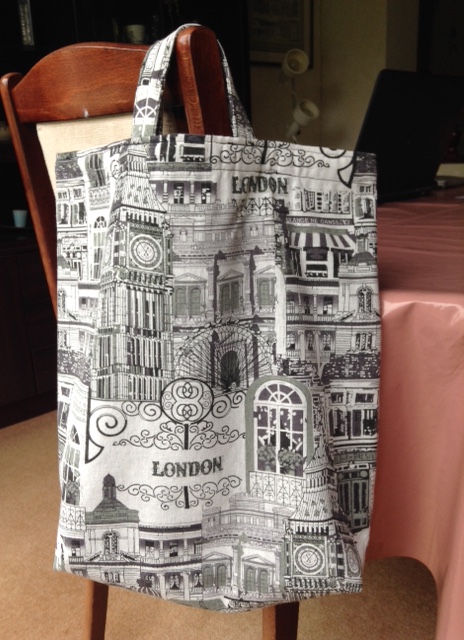
I think this bag may be making regular trips to the supermarket. And I have various bits of sturdy fabric that could be used for further bags – probably with longer handles!
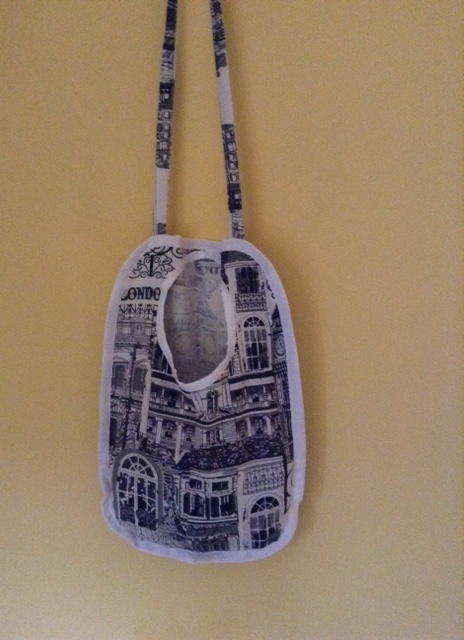
The peg bag. It seems appropriate to have a peg bag that matches the ironing board. The original was a very old design from Boots. I like the design as I put it round my neck when in the garden, and can easily reach for pegs, and otherwise have two free hands. I don’t understand why all peg bags aren’t made like this….
The original got a hole in it, and I asked my Mum to make a copy replacement, which she duly did. So that must be over 6 years ago, as I’ve had my new sewing machine for that long. Now that one has a hole in it too. I used the same tape to finish the peg bag as I used round the ironing board. Again, I pinned and tacked to ensure it was stitched tidily round the corners.
So I made all of that lot in a day. I’m not sure what the total cost is, as I had most of the ‘ingredients’ in stock, but it must be about £8 – £9, for the whole lot. And apart from the heat resistant wadding, which is in the post, for £4 a metre, the oven glove will come from the same cost base. That makes them all real bargains compared to shop prices. All very satisfying, and needed
2 comments on “The London fabric”
Leave a comment
One Week, One Pattern

Me Made May 2016

Me Made May 2015

Simplicity Competition

Sew Over it Patterns


Hi Ann,
Are you attending Sew Up North in a few weeks? Be good to meet up again!
Regards Angela
Sent from my iPhone
>
Hi Angela. Well I am booked to go, but I don’t know for certain that I will attend. As well as having an event in Birmingham in the evening, I was in Leeds a couple of weeks ago and bought quite a lot of fabric…. So being very honest, I don’t need any more right now! Not sure. I will let you know, then we can look out for one another. Ann