
A straw hat
I’ve been back to Inkberrow Design Centre in Redditch to make another hat! It’s a fun thing to do every so often.
To be honest, I thought we would be weaving straw to create our hats, but I was wrong. Straw hats are made out of cones, just the same way as the felt hats are. Except that a straw cone costs more than felt. With straw, you pay for what you get. Machine made cones are generally expensive, so we’re using hand woven straw cones. They are a little more rustic, which is fine, because I was after a straight forward floppy hat, for which rustic is best!
This was all good news because I had enjoyed blocking my felt hat with steam. Blocking the straw was a bit easier, simply dampening the straw and pulling gently and evenly over the block. Actually, it was a disappointingly quick process. Slightly wet straw is surprisingly malleable. Drying it with a hair dryer, or even in the sun, took a lot longer.

Blocking in the millinery studio
Then comes the smelly process of stiffening the crown. Once that was dry, I removed my crown from the block with some degree of difficulty. I can see why the blocks have finger holes underneath. I used mine to gently ease the hat from the wooden shaper.
A block very slightly bigger than the circumference of my head had been selected. To assess the point at which the crown would become the brim, the top of my head, ear to ear, was measured, and I carefully marked that measurement all the way round my hat. Getting that dividing line was probably the hardest part of the making process; I had to use the iron, over a brim block, to gently push out an angle at the measured line. It’s best to put greaseproof paper over both the block and the hat, just to make sure that nothing that might have contaminated either the block or the iron, get onto the precious hat.

By now I had something that was a bit raw, but very much looked like a straw hat, and I could try it on to assess any refinements. The main refinement was to cut 2cm from the brim, and that was about it. It just remained to create a professional finish to the head gear.

A raw straw hat ready for refinements
First was to sew a length of curved petersham ribbon inside the hat at the dividing line between the brim and the crown. Petersham stitch – awful. Tiny neat stitches into the rounded top of the ribbon. But one has to persevere, and I stitched right round, with the neater finish inside. Therefore you then need to cover the outer side of the hat at the same point. If I’d have had straw coloured bias binding, I’d have used it. I found the nearest match, and the used the same colour to finish the edge that I had trimmed by 2 cm.
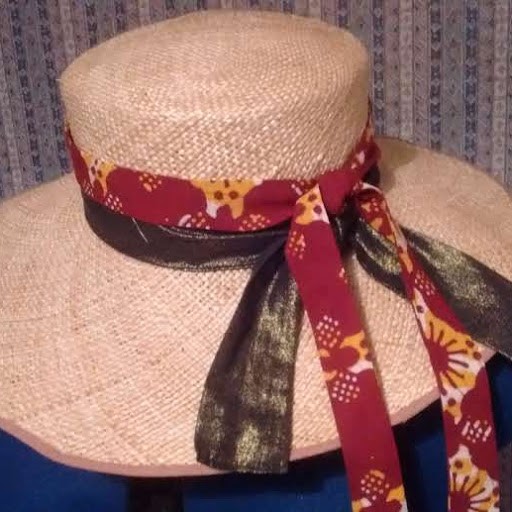
The resulting hat would be wearable, but a large part of the fun of millinery is the decoration. My intention was to create a range of simple trims that would match outfits.
So here are two used at the same time, from recent makes. You get the idea.
Actually, I think it is quite hard to believe that I made this myself. The total cost of materials was round about £25, adding nothing for the cost of the course tutor or my time. So what this tells me is that if you see a straw hat for sale for £15, and you do sometimes, then it is made from cheaper straw and not built to last. Hand made, and quality!
One Week, One Pattern

Me Made May 2016

Me Made May 2015

Simplicity Competition

Sew Over it Patterns

