
TMA Vest Top – All about Trimmings
The Maker’s Atelier Autumn 19 magazine was all about the Vest Top and trimmings. It’s taken me until the following summer to pick up the magazine again and have a play with the pattern.
There are two reasons i have enjoyed ‘playing’ with this pattern:
- The construction method
- Playing with trimmings


I’ve made two (so far). Partly because, having cracked the construction method, i thought i’d better do it again whilst i understood what to do, and partly because i had leftovers of both fabrics that were sufficient for the vest top, but not much else. Note the post lockdown haircut between pictures!
The construction is about getting a neat finish to the lined armholes. The TMA sleeveless sundress uses the same method. And yet i haven’t seen any other pattern use this method in over 10 years of coming back to sewing. Wait for it….. I remember describing this method of constructing a lined armhole in my school sewing exam (probably 1971). Yes, a school sewing exam. When did you last see those three words together? I remember drawing all the diagrams and numbering them, with blue ink circles round each number. Then the teacher marked the exam papers in blue ink, circling the marks, and got the adding up all mixed up. Wasn’t that exactly why we were always told not to use red ink in our work; so that it didn’t get confused with marking, which would always be in red ink? (Oh, if it’s all online line now, this probably doesn’t matter any more!)
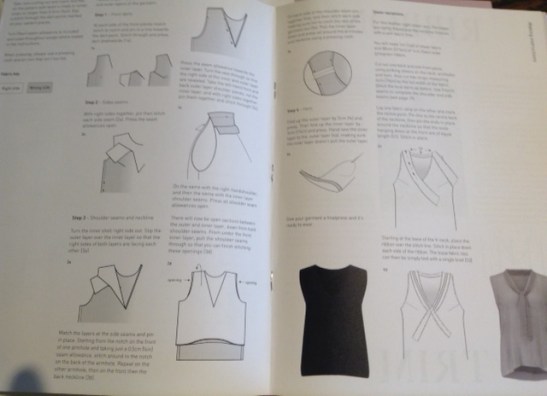
When you get your head around the instructions, its actually quite simple, but if you don’t turn out the top to the right side at the right stage, then not only do the instruction get confusing, but the garment gets all knotted up!
If you can get the method right first time, then cutting out and the basic sewing probably only takes about an hour and a half, or less. The instructions say to stitch the lining hem to the outer hem, but that can cause all sorts of problems with the hang, so i just machine hemmed each layer separately, with the lining about 1cm shorter than the outer layer.
Trimming – deciding how to trim each top took much longer. I used Frances’ ideas in the magazine, and then adapted them to what i had available to me, applying test samples along the way.

In the case of the red version, i had sufficient fabric to create two long strips, based on the ‘tie neck blouse‘ neck band from The Essential Collection. The original idea was to place a ribbon trim over a gathered strip, possibly with a special machine stitch. That didn’t work! In particular, the sewing machine basically flattened the gathered trim. So having decided to just use the gathered trim on its own, the next question was how to attach it. And the answer was, by hand, which would appear to be how Frances attached most of her trims too. The effect is subtle at a distance, but quite noticeable close too. My only concern is how its going to come out of the wash – potentially quite crumpled, and difficult to restore to its pre-wash state. I think much steam will be called for.

The other one (blue, pink, yellow), i had less fabric to play with. I played with two ideas for trimmings, to be deployed either together or separately. I made a couple of rosettes out of fabric strips, to be placed at the V. Neither was brilliant, especially given that the fabric already features flower rosettes – why add more? It took me a while to realise that. The other idea was to use two rows of lace, having ventured onto the market for the first time in 4 months and purchased some white lace, although it wasn’t intended for this. Washing was influential to this design as well, as the blue fabric runs, so there was a risk of ending up with pale blue lace. A test seemed to suggest that the lace might stay white. And then i realised that there was just enough black lace in my trimmings box.
They all stayed on my tailor’s dummy for some days whilst i decided what looked best. Eventually the white lace won out, as it stood out most, and i dumped the rosettes in favour of one of my mother’s old broaches. It’s possible that the broach is handmade. I must remember to remove it before washing!
Well this summer can’t make up its mind whether to be hot and sunny, or wet and windy. And with many other garments awaiting more hot and sunny days, and an embryonic UK holiday being planned for later in the year, they may not get much wear until next year. Then who knows where i might get to wear them!
One Week, One Pattern

Me Made May 2016

Me Made May 2015

Simplicity Competition

Sew Over it Patterns

